오늘은 테이블 뷰 중에서 xib 파일을 사용해서 커스텀 셀을 구성할 수 있는 방법을 처음 사용해 보았다.
처음 사용하는거라 여러번 막히다가 구글링을 통해 차근차근 다시해보니 금방 할 수 있었다.
xib파일 생성

먼저 tableviewCell 파일을 만들면서 사진과 같이 xib 파일을 같이 선택해서 만들어주면 자동적으로 cell 과 연동된 xib 파일을 만들 수 있다.

Custom

만들어진 xib 파일에 들어가면 cell 의 크기를 하고 있는 테이블 뷰 셀이 있는데 여기서 원하는 컴포넌트를 넣고 cell 을 구성하면 된다.
호출

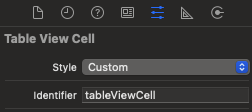
만들어진 cell 내 식별자를 입력하고 VC로 넘어와 만들어둔 xib 을 불러오면 연동 완료
let nib = UINib(nibName: "TableViewCell", bundle: nil)
tableView.register(nib, forCellReuseIdentifier: "tableViewCell")
그리고 datasource를 설정해주면 정상적으로 연동되는 테이블 뷰를 볼 수 있다.
func tableView(_ tableView: UITableView, cellForRowAt indexPath: IndexPath) -> UITableViewCell {
    let cell = tableView.dequeueReusableCell(withIdentifier: "tableViewCell", for: indexPath) as! TableViewCell
    let app = appDataManager.apps[indexPath.row]

    cell.appImage.image = app.appImage
    cell.appTitle.text = app.appTitle
    cell.appDescription.text = app.appDescription
    cell.appCompany.text = app.appCompany
    cell.appStar.text = app.appStar
    cell.appCategory.text = app.appCategory

    return cell

}
'◽️ Programming > UIKit' 카테고리의 다른 글
| JJFloatingActionButton 라이브 러리로 Floting button 만드는법 (3) | 2024.05.05 |
|---|---|
| Singleton Pattern 이란 무엇일까? (1) | 2024.04.19 |
| URLSession (0) | 2024.04.09 |
| CollectionView, Segment Control 개념정리 🧑🏻💻 (0) | 2024.04.02 |
| iOS 네트워킹에 대한 이해 (1) (0) | 2024.03.31 |

