오늘은 첫 팀프로젝트를 진행하기 앞서 CollectionView , segment controller 구현을 맡게되어 먼저 얘네들이 무슨 역할을 할 수 있는지 알아보고자 한다. 자세한 구현 내용은 하단의 프로젝트 일지를 통해 적고 간단한 개념정도만 기록하고자 한다 🙂
CollectionView
먼저 UICollectionView는 순서가 지정된 데이터들을 관리하고 사용자 정의 가능한 레이아웃을 사용하여 표시하는 객체이다.
UICollectionView | Apple Developer Documentation
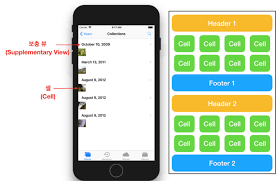
UICollectionView의 구조

크게 구조는 상단에 헤더 뷰를 넣을 수 있는 공간이 있고 컨텐츠들이 들어가는 cell , 하단의 푸터 이렇게 들어가 있다.
헤더나 푸터의 경우 원한다면 생략이 가능하다.
헤더뷰를 사용하는 대표적인 예는 선택, 혹은 설명하고싶은 내용의 텍스트를 적어두는 경우가 있다.
delegate, dataSource의 추가기능
collectionview도 tableview 와 같이 delegate와 dataSource 가 존재한다.
func collectionView(_ collectionView: UICollectionView, numberOfItemsInSection section: Int) -> Int {
    return data.count
}

func collectionView(_ collectionView: UICollectionView, cellForItemAt indexPath: IndexPath) -> UICollectionViewCell {
    let cell = collectionView.dequeueReusableCell(withReuseIdentifier: "Cell", for: indexPath)
    cell.backgroundColor = .lightGray

    let label = UILabel(frame: cell.contentView.bounds)
    label.text = data[indexPath.item]
    label.textAlignment = .center
    cell.contentView.addSubview(label)

    return cell
}
tableview 때도 확인할 수 있었던 셀의 갯수를 지정하는 함수와 셀의 항목 값을 정하는 dataSource 가 존재한다. 이는 필수 기재사항이므로 알맞게 넣어주면 된다.

UICollectionViewCell의 크기 설정
이번 과제를 진행하면서 가장 까다로웠던 부분이 바로 이부분 이었다. 컬렉션 뷰 안의 셀 크기를 잡고 그 안에 이미지와 레이블 값을 위치시키는 것이 잘 구현되지 않았기 때문이다..
먼저 컬렉션 뷰 셀의 크기를 조절하기 위해 두가지 방법이 있다. extension을 통해 확장한 후UICollectionViewDelegateFlowLayout 을 받아 그 안에 크기를 조절할 수 있는 메서드를 넣는 방법과 flowLayout 메서드를 만들어 아예 FlowLayout 을 설정한 후 해당 메서드 안에 알맞게 크기를 맞춰 넣는 방법이 있다.
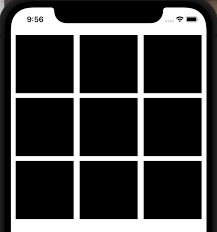
cell 의 크기를 한 라인당 2개 혹은 3개의 cell로 구성하고 싶다면 collectionview의 width 값을 넣고 싶은 셀의 갯수만큼 나눠주면 된다.
- cellSize 공식: (collectionViewWidth - (Cell갯수 - 1) * minimumSpacing) / Cell갯수
extension ViewController: UICollectionViewDelegateFlowLayout {
    // MARK: cellSize 계산
    func collectionView(_ collectionView: UICollectionView, layout collectionViewLayout: UICollectionViewLayout, sizeForItemAt indexPath: IndexPath) -> CGSize {
        let collectionViewWidth = collectionView.bounds.width
        let cellItemForRow: CGFloat = 3
        let minimumSpacing: CGFloat = 2

        let width = (collectionViewWidth - (cellItemForRow - 1) * minimumSpacing) / cellItemForRow

        return CGSize(width: width, height: width)
    }

    // MARK: minimumSpacing 셀과 셀사이의 간격
    func collectionView(_ collectionView: UICollectionView, layout collectionViewLayout: UICollectionViewLayout, minimumInteritemSpacingForSectionAt section: Int) -> CGFloat {
        return 2
    }
    func collectionView(_ collectionView: UICollectionView, layout collectionViewLayout: UICollectionViewLayout, minimumLineSpacingForSectionAt section: Int) -> CGFloat {
        return 2
    }
}

SegmentedControl
SegmentedControl 란?
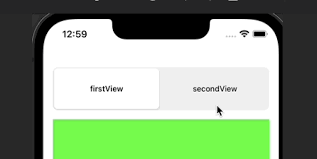
Segmented Control은 iOS 앱에서 여러 옵션 중에서 하나를 선택할 수 있는 인터페이스 요소이며 사용자가 각 옵션을 탭하여 선택할 수 있다.
각각의 옵션은 하나의 세그먼트(segment)로 표시되고, Segmented Control은 일반적으로 설정 화면이나 필터링 옵션, 탭 중심의 탐색 메뉴 등 다양한 용도로 사용된다.

SegmentedControl 사용하기
간단하게 이번 글에서는 스토리보드를 활용해서 사용하는 법을 알아보자
먼저 스토리보드에서 SegmentedControl 컴포넌트를 VC에 넣어준 뒤 연결한다.
import UIKit

class ViewController: UIViewController {

    // Segmented Control과 선택된 옵션을 표시할 레이블을 IBOutlet으로 연결합니다.
    @IBOutlet weak var segmentedControl: UISegmentedControl!
    @IBOutlet weak var selectionLabel: UILabel!

    // Segmented Control의 값이 변경될 때 호출되는 액션 메서드입니다.
    @IBAction func segmentedControlValueChanged(_ sender: UISegmentedControl) {
        // 선택된 옵션을 레이블에 업데이트합니다.
        updateSelectionLabel()
    }

    override func viewDidLoad() {
        super.viewDidLoad()
        // 초기에 첫 번째 옵션이 선택되도록 설정합니다.
        segmentedControl.selectedSegmentIndex = 0
        // 선택된 옵션을 레이블에 업데이트합니다.
        updateSelectionLabel()
    }

    // 선택된 옵션을 레이블에 업데이트하는 메서드입니다.
    func updateSelectionLabel() {
        // 선택된 옵션의 인덱스를 가져옵니다.
        let selectedIndex = segmentedControl.selectedSegmentIndex
        // 선택된 옵션의 제목을 가져옵니다.
        let selectedOption = segmentedControl.titleForSegment(at: selectedIndex) ?? ""
        // 레이블에 선택된 옵션을 표시합니다.
        selectionLabel.text = "Selected Option: \\(selectedOption)"
    }
}
이와 같은 방식으로 응용해서 활용하면 세그의 값이 바뀔때 마다 각각의 다른 view 를 띄워 카테고리 형식으로 메뉴판 구성과 같은 내용을 구현할 수 있다.
이와 같은 세그의 활용으로 프로젝트에서 어떻게 컬렉션뷰와 같이 사용하여 적용되는지 프로젝트 일지에서 확인해보도록 하자 🙂
'◽️ Programming > UIKit' 카테고리의 다른 글
| TableView xib 사용해서 Cell 구성하기 (1) | 2024.04.11 |
|---|---|
| URLSession (0) | 2024.04.09 |
| iOS 네트워킹에 대한 이해 (1) (0) | 2024.03.31 |
| UIKit 에서 UI 구성하는 두가지 방법의 장단점 (스토리보드 , 코드) (0) | 2024.03.28 |
| UIViewController 란 무엇일까? (1) | 2024.03.28 |

