2024.05.13 - [◽️ Programming/T I L] - [Project 일지] 단어장 앱 만들기 (1)
2024.05.14 - [◽️ Programming/T I L] - [Project 일지] 단어장 앱 만들기 (2)
2024.05.15 - [◽️ Programming/T I L] - [Project 일지] 단어장 앱 만들기 (3)
마이 페이지 구현
마이페이지 내 UI를 구현하고 하단에 테이블 뷰를 넣어 구성하였다. 이번에 tableview 를 구성하면서 셀을 구성하는 단위를 새로운 방식으로 넣어보았다.
class MyPageTableViewCell: UITableViewCell {

    static let identifier = "MyPageTableViewCell"

    let iconImageView: UIImageView = {
        let imageView = UIImageView()
        imageView.contentMode = .scaleAspectFit
        imageView.tintColor = UIColor(red: 48/255, green: 140/255, blue: 74/255, alpha: 1.0)
        return imageView
    }()

    let titleLabel: UILabel = {
        let label = UILabel()
        label.font = UIFont.systemFont(ofSize: 17)
        return label
    }()

    override init(style: UITableViewCell.CellStyle, reuseIdentifier: String?) {
        super.init(style: style, reuseIdentifier: reuseIdentifier)
        setupUI()
    }

    required init?(coder: NSCoder) {
        fatalError("init(coder:) has not been implemented")
    }

    func setupUI() {
        contentView.addSubview(iconImageView)
        contentView.addSubview(titleLabel)

        iconImageView.snp.makeConstraints {
            $0.width.height.equalTo(30)
            $0.leading.equalTo(contentView).offset(10)
            $0.centerY.equalTo(contentView)
        }

        titleLabel.snp.makeConstraints {
            $0.leading.equalTo(iconImageView.snp.trailing).offset(15)
            $0.trailing.equalTo(contentView).inset(10)
            $0.centerY.equalTo(contentView)
        }
    }

    func configure(with title: String, systemImageName: String) {
        titleLabel.text = title
        iconImageView.image = UIImage(systemName: systemImageName)
    }
}
테이블 뷰 셀을 구성하는 컴포넌트와 오토레이아웃을 잡은 뒤 cellForRowAt 에 들어갈 데이터를 미리 배치해 전달만 가능하도록 구현하였다.
func configure(with title: String, systemImageName: String) {
    titleLabel.text = title
    iconImageView.image = UIImage(systemName: systemImageName)
}
이 부분을 통해 데이터가 타이틀과 이미지에 들어가게 되고
extension MyPageViewController: UITableViewDelegate, UITableViewDataSource {
    func tableView(_ tableView: UITableView, numberOfRowsInSection section: Int) -> Int {
        return myPageData.items.count
    }

    func tableView(_ tableView: UITableView, heightForRowAt indexPath: IndexPath) -> CGFloat {
        60
    }

    func tableView(_ tableView: UITableView, cellForRowAt indexPath: IndexPath) -> UITableViewCell {
        guard let cell = tableView.dequeueReusableCell(withIdentifier: MyPageTableViewCell.identifier, for: indexPath) as? MyPageTableViewCell else { fatalError("마이 페이지 테이블 뷰 에러")}

        let item = myPageData.items[indexPath.row]
        cell.configure(with: item.title, systemImageName: item.imageName)
        cell.selectionStyle = .none
        cell.backgroundColor = #colorLiteral(red: 0.9607844949, green: 0.9607841372, blue: 0.9521661401, alpha: 1)

        return cell
    }
}
cell.configure(with: item.title, systemImageName: item.imageName)
VC에서는 configure만 불러와 넣어만 주면 원하는 데이터가 잘 들어가게된다.
저장된 단어와 외운단어, 게임 진행 수와 같은 내용은 추후 코어데이터가 적용되면 코어데이터에 저장된 데이터의 count를 넣어 현재 저장되어있는 단어의 갯수를 파악 할 수 있도록 구현할 예정이다.

프로필 이미지 imagePickerView
프로필 이미지를 원하는 사진으로 변경할 수 있게 하기 위해 imagePickerView를 사용하였다.
extension MyPageViewController: UIImagePickerControllerDelegate, UINavigationControllerDelegate {
    func imagePickerController(_ picker: UIImagePickerController, didFinishPickingMediaWithInfo info: [UIImagePickerController.InfoKey : Any]) {
        if let selectedImage = info[.originalImage] as? UIImage {
            profileImage.image = selectedImage
        }
        picker.dismiss(animated: true, completion: nil)
    }

    func imagePickerControllerDidCancel(_ picker: UIImagePickerController) {
        picker.dismiss(animated: true, completion: nil)
    }
}
이렇게 값을 넣어주면 imagePicker 내 선택 된 이미지가 프로필 이미지로 들어가게 된다.

하지만 이 방식은 곧 사라질 수 있는 방식이기 때문에 사진을 불러와 넣을 수 있는 다른 방법을 찾아 교체할 예정이다!
이 내용은 교체 후 기록으로 남겨둘 예정이다.
Calender VC 하단 저장된 단어 CollectionView 구현
class DummyEnglish {
    struct Word {
        let english: String
        let pronunciation: String
        let meaning: String
    }

    let dummyWords: [Word] = [
        Word(english: "apple", pronunciation: "[ˈæpəl]", meaning: "사과"),
        Word(english: "banana", pronunciation: "[bəˈnænə]", meaning: "바나나"),
        Word(english: "cat", pronunciation: "[kæt]", meaning: "고양이"),
        Word(english: "dog", pronunciation: "[dɔg]", meaning: "개"),
        Word(english: "elephant", pronunciation: "[ˈɛlɪfənt]", meaning: "코끼리"),
        Word(english: "fish", pronunciation: "[fɪʃ]", meaning: "물고기"),
        Word(english: "grape", pronunciation: "[greɪp]", meaning: "포도"),
        Word(english: "house", pronunciation: "[haʊs]", meaning: "집"),
        Word(english: "ice", pronunciation: "[aɪs]", meaning: "얼음"),
        Word(english: "juice", pronunciation: "[dʒuːs]", meaning: "주스")
    ]
}
아직 저장된 단어를 가져와 사용할 수 없으므로 임시적으로 더미데이터를 만들어 넣어 보자 🙂
func configure(with word: DummyEnglish.Word) {
    englishLabel.text = word.english
    pronunciationLabel.text = word.pronunciation
    meaningLabel.text = word.meaning
}

-----

extension CalenderViewController: UICollectionViewDelegate, UICollectionViewDataSource {
    func collectionView(_ collectionView: UICollectionView, numberOfItemsInSection section: Int) -> Int {
        return dummyEnglish.count
    }

    func collectionView(_ collectionView: UICollectionView, cellForItemAt indexPath: IndexPath) -> UICollectionViewCell {
        guard let cell = collectionView.dequeueReusableCell(withReuseIdentifier: CalenderCollectionViewCell.identifier, for: indexPath) as? CalenderCollectionViewCell else { fatalError("컬렉션 뷰 오류") }

        let word = dummyEnglish[indexPath.row]
        cell.configure(with: word)

        return cell
    }
}
위에서 설명했던 configure를 통해 쉽게 넣어줄 수 있도록 구현하였다.
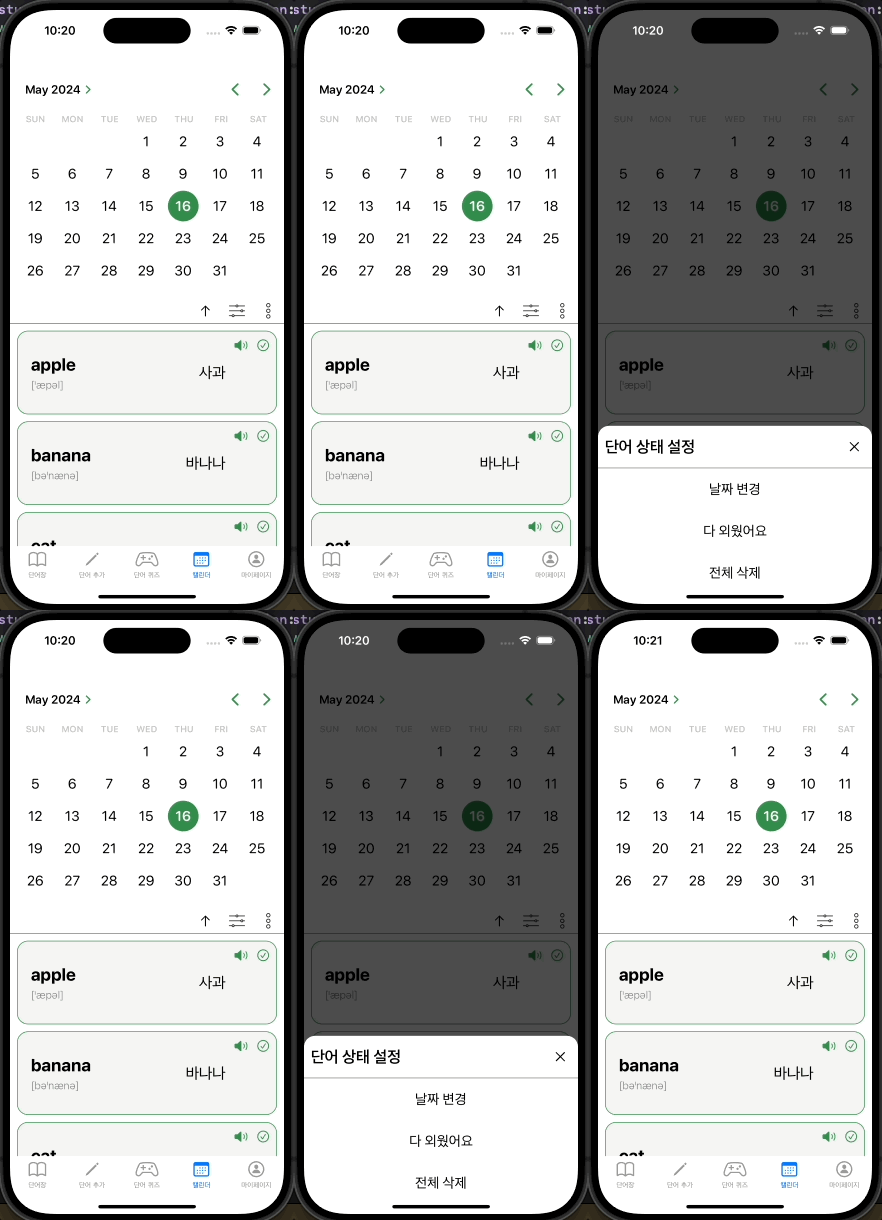
이 외 컬렉션 뷰 셀 내 음성으로 단어를 들을 수 있도록 하기 위해 버튼을 넣어주고, 외운 단어를 체크하기 위해 체크할 수 있는 버튼도 하나 넣어주었다.

구현한 UI는 다음과 같다.
단어 상태 설정 탭 구현
필터 창을 나타내는 뷰와 마찬가지로 마지막 3번째 버튼에 단어 상태를 설정할 수 있는 뷰를 만들었다.
이전에 구현했던 방식과 마찬가지지만 이번엔 뷰가 뜨는 높이를 줄여 더 낮게 구현했다.
class MenuPresentationController: UIPresentationController {

    private let dimmingView = UIView()

    override var frameOfPresentedViewInContainerView: CGRect {
        guard let containerView = containerView else { return CGRect.zero }

        let presentedHeight = containerView.bounds.height * 0.3
        let presentedY = containerView.bounds.height - presentedHeight
        return CGRect(x: 0, y: presentedY, width: containerView.bounds.width, height: presentedHeight)
    }


    override func presentationTransitionWillBegin() {
        guard let containerView = containerView, let presentedView = presentedView else { return }

        dimmingView.frame = containerView.bounds
        dimmingView.backgroundColor = UIColor.black.withAlphaComponent(0.7)
        dimmingView.alpha = 0
        containerView.insertSubview(dimmingView, at: 0)

        let tapGesture = UITapGestureRecognizer(target: self, action: #selector(dimmingViewTapped))
        dimmingView.addGestureRecognizer(tapGesture)

        presentedViewController.transitionCoordinator?.animate(alongsideTransition: { _ in
            self.dimmingView.alpha = 1
        }, completion: nil)

        presentedView.frame = frameOfPresentedViewInContainerView
        containerView.addSubview(presentedView)
    }

    @objc func dimmingViewTapped() {
        presentingViewController.dismiss(animated: true, completion: nil)
    }

    override func dismissalTransitionWillBegin() {
        presentedViewController.transitionCoordinator?.animate(alongsideTransition: { _ in
            self.dimmingView.alpha = 0
        }, completion: nil)
    }

    override func containerViewDidLayoutSubviews() {
        dimmingView.frame = containerView?.bounds ?? CGRect.zero
    }

    func shouldRemovePresentersView() -> Bool {
        return false
    }

}
UIPresentationController 를 활용해 더미 뷰도 만들어 떠있는 뷰 외 나머지 부분을 어둡게 설정하였다.
이전 filter와 다르게 50퍼센트만 뜨게 하는 것이 아닌, 30퍼센트만 뷰가 올라오도록 설정했다.

이렇게 오늘 구현은 끝!
'◽️ Programming > T I L' 카테고리의 다른 글
| [Project 일지] 단어장 앱 만들기 (6) (0) | 2024.05.20 |
|---|---|
| [Project 일지] 단어장 앱 만들기 (5) (0) | 2024.05.19 |
| [Project 일지] 단어장 앱 만들기 (3) (2) | 2024.05.15 |
| [Project 일지] 단어장 앱 만들기 (2) (4) | 2024.05.14 |
| [Project 일지] 단어장 앱 만들기 (1) (0) | 2024.05.13 |

