

3가지 각 다른 컬렉션뷰를 활용해 영화 정보를 가져오는 방식을 구현하고자 한다. CompositionalLayout과 DiffableDataSource를 활용해 유연하고 다양한 컬렉션뷰를 구현하는 방식에 대해서 알아보자!
먼저 각 다른 컬렉션 뷰를 활용하기 위해 enum을 활용해 3가지로 섹션을 분류한다.
enum Section: Hashable {
    case banner
    case horizontal(String)
    case vertical(String)
}

enum Item: Hashable {
    case normal(Content)
    case bigImage(Movie)
    case list(Movie)
}
크게 구성될 배너 부분과 가로로 움직일 호리젠탈, 그리고 밑으로 3가지의 영화가 들어올 수 있는 버티컬 섹션으로 나누었다.
lazy var collectionView: UICollectionView = {
    let collectionView = UICollectionView(frame: .zero, collectionViewLayout: self.createLayout())
    collectionView.register(NormalCollectionViewCell.self, forCellWithReuseIdentifier: NormalCollectionViewCell.identifier)
    collectionView.register(BigImageCollectionViewCell.self, forCellWithReuseIdentifier: BigImageCollectionViewCell.identifier)
    collectionView.register(ListCollectionViewCell.self, forCellWithReuseIdentifier: ListCollectionViewCell.identifier)
    collectionView.register(HeaderView.self, forSupplementaryViewOfKind: UICollectionView.elementKindSectionHeader, withReuseIdentifier: HeaderView.identifier)
    return collectionView
}()
먼저 컬렉션 뷰를 선언해주고 연결할 컬렉션 뷰 셀을 register로 등록해준다.
private func bindViewModel() {
    let input = ViewModel.Input(tvTrigger: tvTrigger.asObservable(), movieTrigger: movieTrigger.asObservable())

    let output = viewModel.transform(input: input)

    output.tvList.bind { [weak self] tvList in
        var snapshot = NSDiffableDataSourceSnapshot<Section, Item>()
        let items = tvList.map { return Item.normal(Content(tv: $0)) }
        let section = Section.double
        snapshot.appendSections([section])
        snapshot.appendItems(items, toSection: section)
        self?.dataSource?.apply(snapshot)
    }.disposed(by: disposeBag)

    output.movieResult.bind { [weak self] movieResult in
        print("Movie Result \\(movieResult)")
        var snapshot = NSDiffableDataSourceSnapshot<Section, Item>()
        let bigImageList = movieResult.nowPlaying.results.map { movie in
            return Item.bigImage(movie)
        }
        let bannerSection = Section.banner
        snapshot.appendSections([bannerSection])
        snapshot.appendItems(bigImageList, toSection: bannerSection)

        let horizontalSection = Section.horizontal("Popular Movies")
        let normalList = movieResult.popular.results.map { movie in
            return Item.normal(Content(movie: movie))
        }
        snapshot.appendSections([horizontalSection])
        snapshot.appendItems(normalList, toSection: horizontalSection)

        let upcomingSection = Section.vertical("UpComing Moives")
        let upcomingList = movieResult.upcomming.results.map { movie in
            return Item.list(movie)
        }

        snapshot.appendSections([upcomingSection])
        snapshot.appendItems(upcomingList, toSection: upcomingSection)

        self?.dataSource?.apply(snapshot)
    }.disposed(by: disposeBag)
}
그 다음 인풋과 아웃풋을 활용해 영화 버튼을 선택하면 컬렉션 뷰가 나오도록 구현할 예정이라 RxSwift에서 bind를 활용해 각 섹션에 데이터가 들어갈 수 있도록 구현해준다.
여기서 집중해서 봐야할 내용은 bind는 이전에 어떻게 활용되는지 기록해뒀으니 이번에는 Snapshot 부분을 살펴보자
var snapshot = NSDiffableDataSourceSnapshot<Section, Item>()
let bigImageList = movieResult.nowPlaying.results.map { movie in
    return Item.bigImage(movie)
}
let bannerSection = Section.banner
snapshot.appendSections([bannerSection])
snapshot.appendItems(bigImageList, toSection: bannerSection)

let horizontalSection = Section.horizontal("Popular Movies")
let normalList = movieResult.popular.results.map { movie in
    return Item.normal(Content(movie: movie))
}
스냅샷에 디퍼블 데이터 소스 스냅샷을 넣어준 뒤 각 섹션의 들어갈 데이터를 바인드 해준다
private func setDatasource() {
    dataSource = UICollectionViewDiffableDataSource<Section,Item>(collectionView: collectionView, cellProvider: { collectionView, indexPath, item in
        switch item {
        case .normal(let contentData):
            let cell = collectionView.dequeueReusableCell(withReuseIdentifier: NormalCollectionViewCell.identifier, for: indexPath) as? NormalCollectionViewCell
            cell?.configure(title: contentData.title, review: contentData.vote, desc: contentData.overview, imageURL: contentData.posterURL)
            return cell
        case .bigImage(let movieData):
            let cell = collectionView.dequeueReusableCell(withReuseIdentifier: BigImageCollectionViewCell.identifier, for: indexPath) as? BigImageCollectionViewCell
            cell?.configure(title: movieData.title, overview: movieData.overview, review: movieData.vote, url: movieData.posterURL)
            return cell
        case .list(let movieData):
            let cell = collectionView.dequeueReusableCell(withReuseIdentifier: ListCollectionViewCell.identifier, for: indexPath) as? ListCollectionViewCell
            cell?.configure(title: movieData.title, release: movieData.releaseDate, url: movieData.posterURL)
            return cell
        }
    })
    dataSource?.supplementaryViewProvider = {[weak self] collectionView, kind, indexPath -> UICollectionReusableView in
        let header = collectionView.dequeueReusableSupplementaryView(ofKind: kind, withReuseIdentifier: HeaderView.identifier, for: indexPath)
        let section = self?.dataSource?.sectionIdentifier(for: indexPath.section)

        switch section {
        case .horizontal(let title):
            (header as? HeaderView)?.configure(title: title)
        case .vertical(let title):
            (header as? HeaderView)?.configure(title: title)
        default:
            print("Default")
        }

        return header
    }
}
그 다음 디퍼블 데이터 소스의 데이터를 넣는 방식을 살펴보면 이전에 DataSource를 활용해 데이터를 넣는 것은 거의 흡사하나 다양한 섹션에 switch를 활용해 각각 데이터를 손쉽게 넣어줄 수 있다.
이렇게 다양한 섹션의 컬렉션뷰에 데이터를 바인딩 하는 내용을 가독성 좋게 구현할 수 있다는 점이 특징이다.
그 다음 가장 많이 시간을 투자한 CompositionalLayout 구현에 대해서 살펴보자 이 내용은 세가지 섹션을 다 다루지 않고 대표적인 한가지만 다루도록 하겠다.
private func createHorizontalSection() -> NSCollectionLayoutSection {
    let itemSize = NSCollectionLayoutSize(widthDimension: .fractionalWidth(1.0), heightDimension: .fractionalHeight(1.0))
    let item = NSCollectionLayoutItem(layoutSize: itemSize)
    item.contentInsets = NSDirectionalEdgeInsets(top: 0, leading: 10, bottom: 0, trailing: 10)

    let groupSize = NSCollectionLayoutSize(widthDimension: .fractionalWidth(0.4), heightDimension: .absolute(320))
    let group = NSCollectionLayoutGroup.horizontal(layoutSize: groupSize, subitems: [item])

    let section = NSCollectionLayoutSection(group: group)
    section.orthogonalScrollingBehavior = .continuous

    let headerSize = NSCollectionLayoutSize(widthDimension: .fractionalWidth(1.0), heightDimension: .absolute(44))
    let header = NSCollectionLayoutBoundarySupplementaryItem(layoutSize: headerSize, elementKind: UICollectionView.elementKindSectionHeader, alignment: .topLeading)

    section.boundarySupplementaryItems = [header]
    return section
}
컴포지셔널 레이아웃 구현을 살펴보면 각각 아이템, 그룹, 섹션, 헤더 부분으로 나누어서 볼 수 있다.
먼저 아이템을 살펴보면
let itemSize = NSCollectionLayoutSize(widthDimension: .fractionalWidth(1.0), heightDimension: .fractionalHeight(1.0))
let item = NSCollectionLayoutItem(layoutSize: itemSize)
item.contentInsets = NSDirectionalEdgeInsets(top: 0, leading: 10, bottom: 0, trailing: 10)
아이템은 컬렉션 뷰 안에 들어가는 셀의 데이터가 들어가는 부분이라고 이해하면 쉽다.
.fractionalWidth(1.0)은 그룹 안에 아이템 영역을 가득 채운다고 이해하면 된다. 각 아이템은 그룹 안에 위치하기 때문에 가득 차게 구현하여 그룹의 크기를 결정하는 방식이 조금 더 수월하게 느껴졌다.
let groupSize = NSCollectionLayoutSize(widthDimension: .fractionalWidth(0.4), heightDimension: .absolute(320))
let group = NSCollectionLayoutGroup.horizontal(layoutSize: groupSize, subitems: [item])
그룹은 아이템을 감싸는 형태로 구현된다고 생각하면 된다. 이 상태로 아이템이 들어온 상태의 크기를 정하게 되면 아이템도 그룹과 같은 크기로 위치할 수 있게 된다.
let section = NSCollectionLayoutSection(group: group)
section.orthogonalScrollingBehavior = .continuous
그 다음 섹션은 그룹과 아이템 모두 감싸는 해당하는 컬렉션뷰의 전체라고 봐도 무방하다. 이를 통해 아이템, 그룹, 섹션 순으로 다 정해준다면 컴포지셔널 레이아웃 구현이 완료된다.
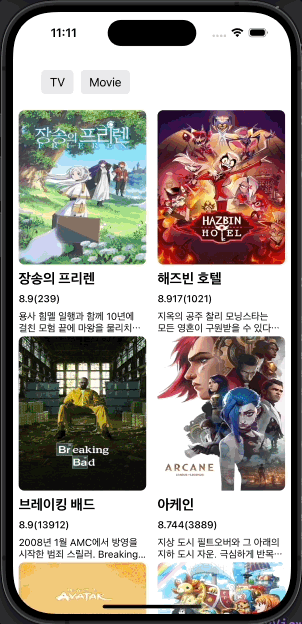
이런 방식으로 각각 섹션별로 레이아웃을 설정해 넣어주면 사진과 같이 각기 다른 성격의 컬렉션 뷰를 유연하게 구현할 수 있게된다.
이 과정을 통해서 컴포지셔널 레이아웃과 디퍼블데이터소스, 그리고 스냅샷에 대해서 확실하게 이해하게 되었다 ㅎㅎ
다음에는 여기서 RxSwift를 활용해 데이터를 실시간으로 변경할 수 있도록 다양한 방식을 시도해 볼 생각이다.
현업에서도 컴포지셔널 레이아웃과 디퍼블데이터소스는 많이 활용된다고 하니 계속해서 살펴보면서 익숙하게 사용할 수 있게 노력하자!
오늘은 여기까지!!
'◽️ Programming > T I L' 카테고리의 다른 글
| Result 타입을 활용해 오류처리 하기(Modern CollectionView) (0) | 2024.08.05 |
|---|---|
| SwiftData 에 대해서 알아보자 (0) | 2024.08.03 |
| Hashable 을 사용하는 이유가 뭘까 (0) | 2024.07.25 |
| [.There 프로젝트 일지] - UI 구성하기 (3) | 2024.07.22 |
| PHPicker 권한 안내 구현하기 (0) | 2024.07.10 |